
Country Sampler Decorating Ideas
DECORATE WITH PAINT (MAGAZINE)
MAY 2003
PAINTER PROFILE:
Though she’s dabbled with brushes and paint since the age of 3, VICTORIA MIRAGLIO didn’t start her painting business until 1998. After leaving the world of film technology, the Pleasanton, California resident says she’s much happier with her calling to faux painting.
What’s your specialty?
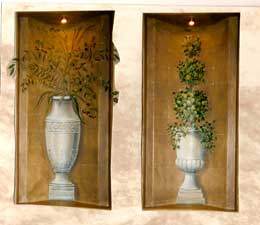
I prefer to do murals. Because I live in Northern California, I do a lot of vineyard murals. I can paint people, animals, water-anything-and I do faux finishes. I paint walls, fabric, furniture-everything except cars.
What kind of paints and brushes do you use?
I work with latex paints and glazes. My favorite paint is Ralph Lauren because I find it to be very thick and rich. For detail work, I use sable brushes, and the filbert brush is my all-time favorite.
What inspires you?
I get inspiration from everywhere: magazines, scenery, greeting cards, even the way sunlight hits objects. I’ve spent a lot of time in Europe, and I love going to the museums.
Do you have any pet peeves?
Unpainted switch plates and heating grates make me crazy. You don’t want to see something ugly in the middle of a faux finish or mural. All you need to do is spray plates and grates with primer, paint them the wall color and faux right over them.
What’s your best advice for do-it-yourself painters?
You should always use a level. It’s great for stenciling, stripes, horizon lines and fence posts. Chances are, your home’s walls are more crooked than you think. Using levels ensures that your painted images won’t bother the eyes of viewers by being crooked.
VICTORIA’S INSIDER TIPS
•Buy big containers of glaze base and pour smaller amounts into shampoo bottles-it makes the glaze very portable and ready for mixing.
•To extend the life of natural-hair brushes was them immediately after use with a combination shampoo and conditioner. When you have more time, soak brushes in Murphy’s Oil Soap.
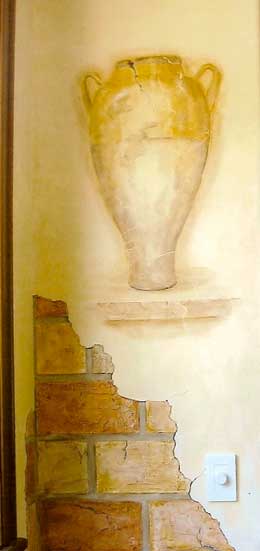
VICTORIA’S DIMENSIONAL FAUX BRICKS
To make a wall look like the plaster has broken away to expose brick below, Victoria came up with this faux finish using drywall mud. Apply the technique to corners and edges of walls, and try to keep the finish out of reach of children.
1.Preplan an area, about 2’x3’, of the wall to paint and mark with pencil.
2.To create the mortar lines between the bricks, fold lengths of 1 ½ “ painters tape in half, nonsticky sides together, then tear them to create irregular edges. Using a level, place the tape on the wall horizontally and vertically as desired to mask off areas for the bricks.
3.Using a taping knife, apply a 1/16 “to 1/8” layer of drywall mud within the taped areas. Let the mud partially dry, and then remove the tape to reveal mortar lines.
4.Paint mortar lines with hues that complement the room’s décor, such as mushroom and gray for a room with a tan color scheme.
5.Mix a glaze with a brownish-gray taupe color and brush lightly over the drywall mud. Note: Experiment with different paint colors, applying randomly to different bricks for a more handmade look. After all paint has dried, lightly dry brush white paint over the bricks and mortar to make them look rough and realistic.
6.To enhance the peeling-plaster effect, use a turkey feather dipped in the paint-and-glaze mixture to create cracks that extend down part of the wall.